Wednesday, July 4, 2012
Some Patriotic Sweetness
And, y'know, the whole Independence Day thing too.
I couldn't let this day pass without some red, white and blue cookies, and the nerd in me wondered: what better way to celebrate than to make one of my all-time favorite character's iconic shield?
Firstly, I'm not a fan of sugar cookies in general. I love they way they look when decorated, but I always find the taste so... blah. And the recipe I found for these cookies wasn't too bad, but not worth explaining in crazy detail, so here's a link to the original recipe (I tweaked mine a bit.)
I wasn't sure how to make these at first, but I'm pretty sure I chose the most difficult method possible, as usual. That's how I roll, which may or may not be recommended, but if you want to know how I did it, here's some instructions.
Firstly, gather the ingredients for your favorite sugar cookie recipe, as long as it's one that holds its shape well when baking (and always refrigerate your dough before baking to make sure the cookies keep their nice edges.) Then, you can either make it and divide the dough into thirds and color them separately, or you can be like me and divide your ingredients into thirds and mix the colors into the wet ingredients before mixing in the dry. One without color, one with blue coloring, and one with red coloring.
Scrape out the dough, wrap each color in plastic wrap and place in the freezer for about 15 minutes or until firm enough to handle easily without being sticky. Using powdered sugar instead of flour to keep the dough from sticking, roll out each of them out to about 1/4 inch thickness.
Here you can see all the cutters it took to make these cookies: large (2" or 1 3/4") circles, one 1" circle, and two tiny linzer cookie cutters, one circle and one star.
Start by cutting out large circles, next cut out the 1" circle from the centers, and then cut out the stars from the smaller circles.
Secondly, take out the red dough and use the 1" cutter to make circles, then the tiny linzer cutter to pop out the centers, just like with the plain dough (only smaller.) and cut long strips of red dough for the outer ring of red on the shield. Like so:
Oh yeah, I bet you're starting to see why this took me four hours to do. Though maybe I shouldn't include the time I wasted trying to find room in the fridge for the pan I was using to keep the dough cool...
Anyhow, next, take out the blue dough. I took the tiny round linzer cutter and cut out little blue circles. You don't need much dough for this, so I recommend doing the whole 'adding color after making the dough' method unless you're making some other cookies like I was. But those didn't turn out nearly so well and are best left forgotten.
Finally, it's time to ASSEMBLE the dough. (Okay, that was a bad one, I'll try to avoid any more horrible puns. Maybe.) Place the red circle within the white circle, and the blue within the red.
Then cut out the little stars from the center, and replace them with the white stars that were cut out earlier. Believe me, having shaky hands doesn't help in the slightest.
To finish things off, wrap the red strips around the whole cookie and, voila!
Ready to bake! Don't forget to set them in the fridge to cool one last time, or they'll spread in the oven.
It worked! Hurrah! I was dancing around the kitchen when I pulled these little beauties out. I like to think I made Cap proud. Now, you can eat as many as you please, then store the rest in an airtight container for up to 4 or 5 days. Hopefully all of you had a fun 4th of July, and didn't spend nearly as much time as I did in the kitchen!
Image of Captain America borrowed from this site and drawn by Luke Ross
Wednesday, June 20, 2012
Sandwich-a-licious Cookies
Now, what comes to mind when you hear the phrase, 'America's favorite cookie?' apart from a nice warm, chocolate chip cookie, that is. You know, that one well-known name brand that will forever cause family divisions over the table about what's better, the creme or the cookie. Ringing any bells? Good, because I have one that's even better.That's right, you read that correctly. I've found a recipe that will make it easy to walk right on by that classic blue package without a pause.
Look at these beauties: crunchy cookies with a deep, rich chocolate flavor and and smooth, creamy vanilla center. Makes you just want to pour a tall glass of milk and have at 'em. Well, soon you'll be able to. I tried out three different recipes that all boasted having the best texture and flavor.
One had melted butter and chocolate, the second was a classic sounding recipe using the classic cocoa powder and creamed butter technique, and the last recipe used powdered sugar. One full day of shifting things around in my overstuffed fridge to precariously balance a cookie sheet to cool rolled dough and cutting little circles as fast as I could to avoid the stifling heat in the kitchen finally gave way to three very different cookies.
The recipe that involved powdered sugar was the worst. It was too sticky and took forever to cool down only to result in dry cookies with all the oomph of an old piece of toast. It wasn't even worth a picture, so it was out of the running as soon as it left the oven.
Next was the classic cocoa powder and creamed butter recipe, which was okay, but okay isn't going to make people demand more of these every time dessert comes around. I didn't bother with any filling for them, but they did earn a picture:
And then, just as I was losing hope, the first recipe I'd chosen came out of the oven and even the color was perfect. Add the heavenly smell and I was sure I had a winner. Once I tasted them I did a little dance, they were so good. It was a recipe I found in the flour cookbook, by Joanne Chang, who owns Boston's Flour + Cafe, and I have to say, this woman is an excellent storyteller. Every recipe has a tale and the whole book balances the perfect line between a bakery recipe book and enough details to work well for the home baker. She's got a creme filling recipe in the book to for these cookies, but I chose to make my own with coconut oil instead of butter, which gave it the perfect consistency.
Grab a glass of milk, and maybe a spoon to smack away sneaky cookie-snatching fingers, and enjoy!
Thursday, June 10, 2010
When life gives you lemons...
Not only that, but she wanted white cake with lemon zest in it, lemon curd surprise in the cupcake and white icing. A rather simple and doable order, except that I had prepared for red velvet and had no lemons what so ever.
She happily informed me that she had gotten some lemons for me. Now I assumed she had gotten me maybe 4 or 5 lemons from the local grocery, oh no, she went to Costco and got a 7 pound bag of lemons.
I have no idea what she thinks I'm going to do with all those lemons, but I'm sure I'll think of something, get ready for some lemony recipes from me!
Anyhow, here's the finished product, doesn't look like much does it? Just another plain ol' vanilla cupcake, right?
Here's how it looks on the inside (sorry for the terrible quality, I took a ton of photos and this was sadly the best I had...) And this was one that had less filling than most, all of the others were demolished by the time I reached for my camera.
White Cupcakes (with lemon zest)
Adapted from Julie Hasson's 125 Best Cupcake Recipes
Ingredients:
1 cup all-purpose flour
1/2 teaspoon baking powder
1/4 teaspoon baking soda
pinch of salt (only if using unsalted butter)
3/4 cup granulated sugar
1/4 cup butter, softened
2 egg whites
1 teaspoon vanilla or almond extract
2/3 cup buttermilk (if you don't have buttermilk, use you regular milk and add 2 teaspoons distilled white vinegar, stir and let sit for 10 minutes)
1. Preheat oven to 350 degrees F
2.in a small bowl, sift together flour, baking powder, baking soda and salt
3. in a larger bowl, beat butter until smooth, beat in sugar completely. Add in egg whites one at a time, beating after each until smooth, add in extract
4. alternate adding in the flour mixture and the buttermilk, mix just until smooth
5. scoop batter into lined cupcake pans, bake 20-25 minutes, turning pans halfway through if needed. Cool 10 minutes in pan before finishing cooling on a wire rack.
Lemon Curd
I used a really simple but delicious recipe from a website I love:
http://allrecipes.com/Recipe/Lemon-Curd/Detail.aspx
You'll need a piping bag or a plastic sandwich bag with one corner snipped off (just a tiny bit!)
1. When both the cupcakes and lemon curd are cool (the lemon curd should be maybe lukewarm at most, room temp is best though) fill your piping bag with about a cup of the lemon curd. Make sure to seal or twist it shut as to avoid messes.
2. Poke a small hole into the top of each cupcake with a chopstick or cake tester, push tip of piping bag into the hole and squeeze gently until you feel the cupcake swell slightly or get a little heavier. Gently remove piping bag. Repeat with all of the cupcakes.
3. Gently wipe off any overflowing curd from the cupcakes and lightly frost the cupcakes, making sure to hide the holes.
4. Unwrap and take a bite!
The icing was just a basic vanilla buttercream, the cupcakes are pretty sweet so you don't need much icing to finish them off or it'll be too much.
Wednesday, May 26, 2010
And the two shall become one...
Don't worry if they sink in the middle, just use the toothpick test to check if they're finished. They should also have a brownie-like crust over the top, it is more obvious once the cupcakes are completely cooled.
Here's another, closer look. Sorry about the lack of frosting, but the camera was still acting up and I couldn't get any pictures of these once they were frosted. They're not the prettiest cupcakes you'll ever see, but they won every taste test hands down.
I iced them with a coffee frosting (they only need a little) made the same way as described in my other post, the Tin Tin Surprise. Just halve the recipe to avoid making too much.
My worries about texture were proven insubstantial as these babies were not too cakey and not too dense, the perfect combo of cupcake and brownie, pcked full of chocolate flavor and then some chocolate chips. This one's a keeper for sure!
Chocolate Brownie Cupcakes (125 Best Cupcake Recipes, by Julie Hasson)
Ingredients:
¾ cup all-purpose flour
½ cup unsweetened cocoa powder
1 tsp baking powder
¼ tsp salt (only if using unsalted butter)
2/3 cup granulated sugar
2/3 cup packed brown sugar
¾ cup unsalted butter, melted and cooled to room temp
½ tsp vanilla
½ tsp almond extract (I don’t use this, I just add more vanilla, but that’s optional)
3 eggs
2/3 cup semisweet chocolate chips (about ½ of one 12 oz bag)
1. Preheat oven to 325 degrees F
2. In a medium sixed bowl, sift together flour, cocoa powder, baking powder and salt
3. In a larger bowl, whisk together (or use a good ol’ wooden spoon) granulated and brown sugars and butter until smooth. Mix in the extracts and then beat in the eggs one at a time until combined.
4. Add flour mixture until just combine and there are no clumps, stir in chocolate chips.
5. Scoop batter into lined cupcake pan (I use an ice cream scoop) and bake for 28 minutes, turning pan halfway through for even cooking. When toothpick tester inserted into center cupcake comes out with a few crumbs and melted chocolate (from the chips,) cupcakes are done. The tops will not spring back when pressed. Let cool in pan for 10 minutes before finish cooling on a wire rack. Top cooled cupcakes with frosting of choice (I use coffee) and enjoy!
Wednesday, April 7, 2010
Coconut Cupcakes
Alright, my oven has been fixed. And just ion time for my housemate's birthday!
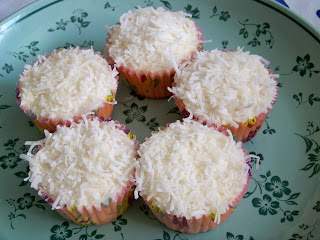
She wanted cupcakes and she told me to surprise her with anything but chocolate. All I knew was that she liked coconut, so coconut cupcakes it was! And I found an amazing recipe for these litte jems. They were moist, light and super delicious!
I also had some pictures, but the camera has been taken across the country by my mother, so I'll add them in when she returns.
And here's the recipe (from 125 Best Cupcake Recipes, by Julie Hasson):
Coconut Cupcakes
Ingredients:
1 1/2 cups all-purpose flour
1/2 cup sweetened shredded/flaked coconut
3/4 teaspoon baking powder
1/2 teaspoon baking soda
1/4 teaspoon salt (only if using unsalted butter)
6 tablespoons butter, softened
1 1/4 cups granulated sugar
3 egg whites
1 cup buttermilk ( if you don't have buttermilk, use 1 cup of regular milk and mix in 2 teaspoon of distilled white vinegar, let sit for a few minutes before using)
1. Preheat oven to 350 degrees F
2. spread coconut evenly over a cookie sheet and toast in oven for about 5 minutes or until they are slightly brouwn, watch them carefully or they will burn! set aside to cool.
3. In a small mixing bowl, sift together the flour, baking powder, baking soda and salt (if needed.)
4. In a seperate, larger bowl, beat the butter until smooth, add in sugar and beat until light and smooth. Add egg whites one at a time, beating them in completely after each addition.
5. Add cooled coconut to flour mixture and pour half into the butter mixture. Mix well.
6. Pour buttermilk into the nowl and mix until completely combined.
7. Add in the rest of the flour mixture and mix until smooth.
8. Scoop into lined cupcake pans and bake for 20-25 minutes.
9. When cupcake are finished (a toothpick poked into the center of a cupcak in the middle of the pan comes out clean) remove from oven and let cool.
Frosting: If you like lots of frosting, this recipe can easily be multiplied.
Ingredients
1/2 cup unsalted butter, room temperature (for buttercream, you need to use unsalted butter for the right taste)
pinch of salt (a tiny pinch, mind you)
3 cups confectioner's/powdered sugar
1/2 tsp vanilla
1 cup sweetened shredded/flaked coconut
1. In a mixer, cream the butter (don't use the wisk! only the paddle attachment or a wooden spoon for those doing it by hand) until smooth and light. Add sugar and salt, beat until light and fluffy, add vanilla and beat until completely smooth. If the frosting is too thick, add 1/4 cup milk and beat until smooth.
2. In a shallow bowl or small plate, spread out the coconut.
3. Frost your cupcakes, then simply turn them puside down and dip into the coconut, making sure to completely coat the top. Repeat with all of the cupcakes, then unwrap one and eat it!
I really like this recipe and I might try to turn them into Pina Colada cupcakes. We'll see...
Monday, March 29, 2010
Sadness
Soon, there will be more baked goodness, but sadly, not today.
Thursday, March 11, 2010
Tin Tin surprise

The characters I used for my mom's gift are the five in the middle. Starting on the left, the bearded man in the blue sweater is Captain Haddock, then TinTin, Snowy and the identical not-brothers Dupond and Dupont (in english, they're called Thompson and Thomson.)
I made fondant silouettes of the character's profiles and put them on cupcakes.
My mom was pretty psyched about the whole thing, bringing them in to the office to show them off to all of her co-workers. Mission birthday present was a success!
I used mocha cupcakes with coffee buttercream. The cupcakes were a little lacking, but the buttercream was a definate keeper! On the sweet side, but you can always use less sugar than the recipe calls for.
Ingredients
1 cup unsalted butter, room temp
3 cups powdered sugar
1 teaspoon vanilla
1 tablespoon instant coffee granules
4 tablespoons hot water
Cream the butter until smooth. In a smaller bowl, dissolve coffee granules in the hot water. Slowly add sugar 1 cup at a time to butter, alternating with sugar, vanilla, sugar, coffee, and finally sugar. Mix until smooth and spread onto cooled cupcakes of your choice.
This frosting is pretty sweet, so make sure to ice your cupcakes in moderation.
Wednesday, March 10, 2010
Double the chocolate, double the fun!
Today we have Chocolate White Chocolate Chip Cookies. Sounds good already, doesn't it?
Now, this recipe is much easier to mix with a machine, but seem to get a kick out of getting hand cramps. I usually ignore my shiny mixer for a good old fashioned wooden spoon. Please use some of the sense that I am clearly lacking and use an electric mixer.
On to the recipe!
Ingredients:
1 cup butter, softened (salted, if using unsalted, add 1 tsp salt to flour)
2 cups sugar
2 eggs
2 teaspoons vanilla extract
2 cups all-purpose flour
3/4 cup cocoa powder
1 teaspoon baking soda
2 cups (or 1 12 oz bag) white chocolate chips
Anyhow, you'll want to start with creaming the butter and sugar together until light and fluffy. Beat in the eggs one at a time, then add the vanilla.
In a sperate bowl, sift together the flour, cocoa powder, baking soda (and salt if needed.)
Add the dry ingredients to the butter mixture and stir until just combined, mix in the chocolate chips.
It should look something like this:
Maybe not quite as appetizing as the last chocolate chip cookie dough, but just you wait.
You can make mini cookies like these...
Sunday, February 21, 2010
Red Velvet Awesome!
Now, I've tried some red velvet recipes in the past, only to get less than pleasing results. But I was willing to try once again, and apparently the recipe gods heard my wish, because I found one heck of an amazing recipe! And even some pretty awesome icing to top them with.
The sprinkles are just tiny red circles that I got in a winter sprinkles collection, the were called red winterberries, I believe. Pretty snazzy, eh?
And yes, I will share this amazing recipe!
Red Velvet Cupcakes
2 1/2 cups sifted cake flour (or all purpose flour)
1 teaspoon baking powder
1 teaspoon salt (only if using unsalted butter)
2 tablespoons unsweetened cocoa powder
1 oz. red food coloring
1/2 cup butter, softened
1 1/2 cups sugar
2 eggs, at room temperature
1 teaspoon vanilla extract
1 cup buttermilk, at room temperature (if you don’t have any buttermilk, you can take 1
cup of milk, add 1 teaspoon of distilled white vinegar, mix and let sit for ten minutes.)
1 teaspoon white vinegar
1 teaspoon baking soda
1. Preheat oven to 350 degrees. Line two 12-cup muffin tins or silicone pans with cupcake liners.
2. Sift together the flour, baking powder, and salt into a medium bowl and set aside. In a smaller bowl, sift cocoa powder and mix in food coloring to form a thin paste without lumps and set aside.
3. In a large bowl, using a wooden spoon or stand mixer, beat butter and sugar together until light and fluffy, about three minutes. Beat in eggs, one at a time, then beat in vanilla and the red cocoa paste, scraping down the bowl with a spatula as you go. Add one third of the flour mixture to the butter mixture, beat well, then beat in half of the buttermilk. Beat in another third of flour mixture, then second half of buttermilk. End with the last third of the flour mixture, beat until well combined, making sure to scrape down the bowl with a spatula.
4. In a small bowl, mix vinegar and baking soda. Be careful as it will fizz so don't do it in a shallow bowl. Add vinegar mixture to the cake batter and stir well to combine. Fill cupcake cups with cake batter until they are a little under 3/4 full. I use my trusty ice cream scoop. Bake for about 20-22 minutes, rotating pans halfway through. The cupcake are done when you insert a toothpick into a cupcake in the center of the tin and if it comes out clean.
5. Cool the cupcakes in their tins on a wire rack for 10 minutes then remove and allow to cool completely before frosting.
Cream Cheese Frosting
This recipe is enough for me to frost about 20 cupcakes, but I frost sparingly, If you like a lot of frosting on your cupcakes, you can double this recipe easily.
1 (8 oz) package of cream cheese, softened
¼ cup butter, softened
2 cups confectioner’s sugar, sifted
1 teaspoon vanilla extract
1. Cream together the cream cheese and butter until fluffy and smooth.
2. Mix in the confectioner’s sugar and vanilla extract until smooth.
3. Frost your cupcakes and enjoy!
Saturday, February 13, 2010
Olympic Games
This one is my favorite. I only have the primary colors for fondant so I got to mix the rest, which was pretty fun.
Here's the rings, not my proudest work, but whatever.And finally, the torch! Not the torch they used for this years opening ceremonies obviously, but I'm not awesome enough to try that yet. I went for a more traditional (as in generic) look.
And then a quick look at all of them together. Yeah, ignore that crumb in the corner...
Wednesday, February 10, 2010
Roll Out!
Ingredients:
10 tablespoons butter, softened
1 1/4 cup sugar
4 eggs
1 1/2 teaspoon vanilla extract
1 1/2 cup all purpose flour
3/4 cup cocoa powder
1/2 teaspoon salt (only if you use unsalted butter)
2 teaspoons baking powder
3/4 cup milk
1. Preheat oven to 350 degrees F
2. Beat together butter and sugar until light and fluffy, add eggs one at a time with vanilla extract, beat until smooth.
3. Sift together flour, cocoa powder, salt (only if using unsalted butter) and baking powder and mix half into the butter and eggs, pour in milk and stir until smooth. Add in second half of flour mixture and stir until smooth.
4. set cupcake pan with cupcake liners and use an ice cream scoop to fill liners (scoop size will vary depending on the size of your cupcakes, batter should fill 2/3 of the cupcake liner otherwise it will overflow.)
5. Bake 18-20 minutes or until a toothpick inserted into the center comes out clean.Ice and enjoy!
Sooner or later, I'll post a good icing recipe, but until then, just use your favorite.
Friday, January 29, 2010
Finished... for now

Looks tempting doesn't it? Well, resist the urge to devour so we can reach step two! I left my trusty scoop for a regular spoon to make larger cookies.

These baked at a slightly lower temp for a little longer (325 degrees rather than the usual 350 and for 15-18 min instead of the usual 8-10.)
You'll be glad you saved some of that batter once you see these.

These cookies were the most delicious of all the recipes, but the texture was just a bit off, a little too grainy and crumbly for my tastes. So I tried the recipe again, but this time creaming the butter. And they were even better! A crisp outside to a tender, moist, chewy inside.
Well, I'll keep on trying more of these recipes I've collected, but much more slowly and over time, rather than crammed into just a few days. Up next is either oatmeal raisin or some cupcake recipes. Hmm...
Here's the winning recipe for anyone who'd like to try it:
Ingredients:
2 cups all-purpose flour
½ teaspoon baking soda
¾ cup butter (salted), softened (or melted if you prefer cookies with more texture)
1 cup packed brown sugar
½ cup white sugar
1 tablespoon vanilla extract
1 egg
1 egg yolk
1 (or 1 ½ if you want really loaded cookies) chocolate chips
Oven pre-heated to 325 degrees F
1. Sift together the flour and baking soda, set aside.
2. Cream the butter with the sugars, add the vanilla and eggs, beating until a few shades lighter and a bit fluffier (if using melted butter, just beat until completely mixed in.)
3. Mix in the sifted ingredients until just blended together (as in no clumps of flour,) add the chips and mix in (do this by hand with a wooden spoon if you’ve used a machine so far.)
4. Drop cookies onto non-stick/greased/parchment paper-ed baking sheet about 2-3 inches apart. Bake for 15-17 minutes or until golden brown. (Those of you with temperamental ovens, remember to turn your cookie sheets halfway through baking.)
Enjoy!
Sunday, January 24, 2010
Getting Started
As anyone could probably guess, I am not only a baker, but I'm also a nerd. I love comic books and play D&D every weekend, which will probably result in bad gaming jokes being made every now and then. I might even build up enough courage to throw some art in here. Anyhow, back to baking, I've started with the basic of any cookie collection. The chocolate chip cookie. The only problem is that there are a LOT of recipes out there for me to try (luckily my gaming friends don't mind being bombarded with baked goods whenever they come over.) I'll be testing out only the recipes that have proven tried and true and I've narrowed it down to seven for now, though I'll always be on the lookout for even better ones. When I think of the perfect chocolate chip cookie, I imagine one that is nice and thick, but not cakey, golden brown and cripsy on the outside while still chewy and wonderful inside. The toughest part of getting this right isn't just a good recipe, but also keeping a close eye on my tempermental oven.
So far I've tried three recipes, two last weekend and one more yesterday. The first was okay tasting but was far too cakey and a little bland. The second was my favorite of the three, the cookies held their shape without losing that great cookie texture. And while they were lightly crispy on the outside, they stayed chewy inside even after cooling completely. The flavor was pretty good too. But I couldn't stop there, so I tried another last night. The flavor was great but the cookies were flat and a little too crispy for me. I might try it one more time making larger cookies (I made mini cookies with my trusty 1 oz scoop) to see if it makes a difference in the texture.
Well, that's it for today, I've got one recipe to retry and four more to test out. I should have two or three done by next week and hopefully some pictures too!
Here's the recipe for the second (and most successful) batch:
Ingredients
1 cup butter, softened
1 cup white sugar
1 cup packed brown sugar
2 eggs
2 teaspoons vanilla extract
3 cups all-purpose flour
1 teaspoon baking soda
1/2 teaspoon salt
2 cups semi-sweet chocolate chips
1 cup chopped walnuts (optional)
1. Preheat oven to 350 degrees F (175 degrees C)
2. Cream together the butter, white sugar and brown sugar until smooth. beat in the eggs one at a time, then stir in the vanilla. Sift together the flour baking soda and salt and stir into the batter. Add in the chocolate chips and nuts. drop by large spoonfuls (use a small scoop for evenly sized cookies) onto ungreased pans (I used a non-stick cookie sheet, otherwise I usually have a parchment sheet under the cookies to avoid any sticking.)
3. Bake for about 10 minutes in the preheated oven, or until edges are nicely brown. (You may need to rotate the pan halfway through to make sure the cookies bake evenly if you have an oven as tempermantal as mine.) Let sit for a few miutes then move cookies to a cooling rack to finish setting up. Or you could eat them while they're warm and gooey. Just saying.