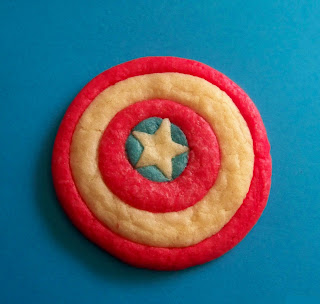
Hey everybody, it's the 4th of July, and you know what that means:
And, y'know, the whole Independence Day thing too.
I couldn't let this day pass without some red, white and blue cookies, and the nerd in me wondered: what better way to celebrate than to make one of my all-time favorite character's iconic shield?
Firstly, I'm not a fan of sugar cookies in general. I love they way they look when decorated, but I always find the taste so... blah. And the recipe I found for these cookies wasn't too bad, but not worth explaining in crazy detail, so here's a link to the original recipe (I tweaked mine a bit.)
I wasn't sure how to make these at first, but I'm pretty sure I chose the most difficult method possible, as usual. That's how I roll, which may or may not be recommended, but if you want to know how I did it, here's some instructions.
Firstly, gather the ingredients for your favorite sugar cookie recipe, as long as it's one that holds its shape well when baking (and always refrigerate your dough before baking to make sure the cookies keep their nice edges.) Then, you can either make it and divide the dough into thirds and color them separately, or you can be like me and divide your ingredients into thirds and mix the colors into the wet ingredients before mixing in the dry. One without color, one with blue coloring, and one with red coloring.
Scrape out the dough, wrap each color in plastic wrap and place in the freezer for about 15 minutes or until firm enough to handle easily without being sticky. Using powdered sugar instead of flour to keep the dough from sticking, roll out each of them out to about 1/4 inch thickness.
Here you can see all the cutters it took to make these cookies: large (2" or 1 3/4") circles, one 1" circle, and two tiny linzer cookie cutters, one circle and one star.
Start by cutting out large circles, next cut out the 1" circle from the centers, and then cut out the stars from the smaller circles.
Secondly, take out the red dough and use the 1" cutter to make circles, then the tiny linzer cutter to pop out the centers, just like with the plain dough (only smaller.) and cut long strips of red dough for the outer ring of red on the shield. Like so:
Oh yeah, I bet you're starting to see why this took me four hours to do.
Though maybe I shouldn't include the time I wasted trying to find room in the fridge
for the pan I was using to keep the dough cool...
Anyhow, next, take out the blue dough. I took the tiny round linzer cutter and cut out little blue circles. You don't need much dough for this, so I recommend doing the whole 'adding color after making the dough' method unless you're making some other cookies like I was. But those didn't turn out nearly so well and are best left forgotten.
Finally, it's time to ASSEMBLE the dough. (Okay, that was a bad one, I'll try to avoid any more horrible puns. Maybe.) Place the red circle within the white circle, and the blue within the red.
Then cut out the little stars from the center, and replace them with the white stars that were cut out earlier. Believe me, having shaky hands doesn't help in the slightest.
To finish things off, wrap the red strips around the whole cookie and, voila!
Ready to bake! Don't forget to set them in the fridge to cool one last time, or they'll spread in the oven.
It worked! Hurrah! I was dancing around the kitchen when I pulled these little beauties out. I like to think I made Cap proud. Now, you can eat as many as you please, then store the rest in an airtight container for up to 4 or 5 days. Hopefully all of you had a fun 4th of July, and didn't spend nearly as much time as I did in the kitchen!
Image of Captain America borrowed from this site and drawn by Luke Ross
Subscribe to:
Post Comments (Atom)


No comments:
Post a Comment